Feel like the intended location for the TV is in a horrible spot? No worries…. you can relocate it.
Relocating the TV in your travel trailer can be a great way to improve viewing angles, maximize space, or make your living area more functional. Whether you're upgrading to a larger TV, moving it for a better viewing position, or adding a TV to a new spot, this project requires a few key steps to ensure a secure and aesthetically pleasing result.
Steps for Relocating the TV in Your Travel Trailer:
1. Plan the New TV Location
Identify the Best Viewing Spot: Consider factors like comfort, visibility from seating areas (couch or dinette), and ease of installation. The TV should be positioned at a height where it's easy to watch without straining your neck, and it should be visible from various parts of the trailer.
Consider Electrical and Cable Access: The new location needs to have access to power and possibly a TV antenna or cable input. Plan how to route cables (power, HDMI, antenna) neatly without creating tripping hazards or visible clutter.
Space Considerations: Make sure the space is large enough to accommodate the TV and mount and ensure that it won’t interfere with other features like windows, doors, or vents.
2. Choose the Right Mounting System
Fixed Mount: If you prefer the TV to stay in one spot, a fixed wall mount might work best. This mount is securely attached to the wall and keeps the TV in a fixed position.
Tilting or Swivel Mount: A tilting mount allows you to adjust the angle of the TV vertically, while a swivel mount lets you move the TV from side to side for better viewing from different seating positions. This can be especially useful if you want flexibility and to move the TV into different angles when needed.
3. Prepare the New Mounting Location
Check Wall Construction: Ensure the wall you are mounting the TV on can handle the weight of the TV and mount. In most cases, you’ll want to mount it to studs or solid framing behind the wall rather than relying on thin paneling. Use a stud finder to locate the studs and mark them. The simplest way to find the studs is by knocking on the wall. If the sound is hollow, there is no stud. A solid sound indicates a stud.
Mark the Mounting Height and Position: Use a level to mark the precise height where the mount will go. Keep in mind the TV size and viewing comfort when determining the optimal height.
4. Install the TV Mount
Attach the Mounting Bracket to the Wall: Follow the manufacturer’s instructions for your chosen mount. Typically, you’ll need to drill holes into the studs and secure the mount with screws or bolts. If there isn’t a stud at the locations of the holes in the mount, use a backer panel. Cut and attach the panel to the studs and then attach the mount to the backer panel.
Mount the TV Bracket to the TV: Attach the corresponding mounting bracket to the back of the TV, ensuring it’s tightly secured. Most TVs come with a VESA-compatible mounting bracket but double-check the hole pattern to ensure compatibility.
Secure the TV to the Wall Mount: Once the mount is secured, carefully lift the TV and hook it onto the wall bracket, making sure the TV is locked into place and secure.
5. Cable Management
Run Cables to the New Location: If you’re moving the TV to a new spot, you'll likely need to relocate the power cable and any video/audio cables (HDMI, antenna, etc.).
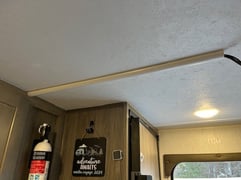
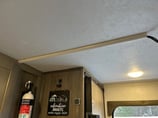
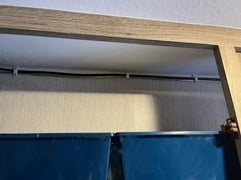
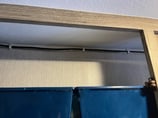
Use Cable Covers or Raceway: To keep cables tidy and protected, use cable raceways or cable covers. These can be mounted along the wall or ceiling and are available in various colors and styles to blend with your decor. Some can be pained and many have adhesive.
Use Cable Clips: Another way to manage the cables is using cable clips. These are best used in hidden locations such as the interior of cabinets.
6. Travel Days
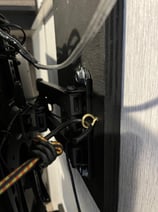
When you're hitting the road in your travel trailer, keeping your TV securely in place during travel days is a must, especially considering the bumps, turns, and vibrations that come with being on the move. One simple yet effective solution for securing your TV is using eye hooks and bungee cords. This combination offers flexibility, ease of use, and reliable hold to make sure your TV stays safe and sound.
Happy watching!
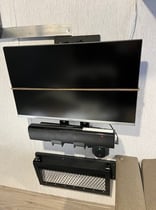
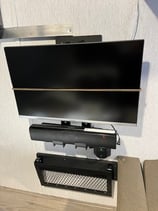
How to relocate the tv from bathroom wall to end of the bed in Sunset Park RV 16BH:
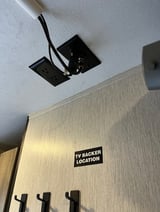
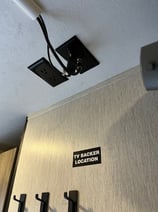
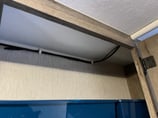
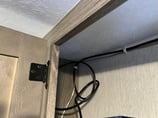
Run wires using cable cover to upper cabinets above dinette from manufacturer's intended location
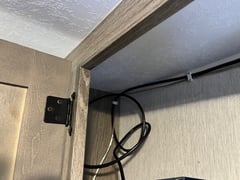
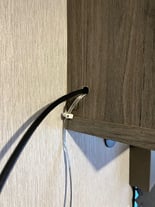
Drill hole in face of cabinet box for wires
Using cable clips, run wires along backside of cabinet box
Drill hole in face of cabinet box for wires at tv location
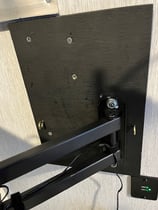
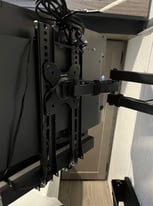
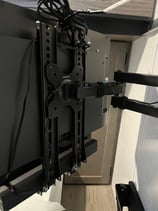
Make (paint if desired) and mount backer panel to studs
Mount tv mount to backer panel
Mount bracket to tv and attach bracket to tv mount
If using a sound bar, attach soundbar mount to the tv before attaching the tv bracket to the tv mount
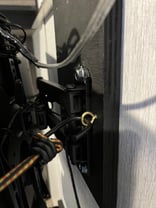
Install eyehooks for bungee cord
Connect wires to tv and sound bar (if using one)
Note:
The Smart TV is 12-volt and it has a built-in DVC/CD player. This is perfect when there is no Wi-Fi or internet access for streaming. It can also be connected to an iPad with a HDMI cable to watch content that has been previously downloaded.
I could not find a suitable 12-volt sound bar. If not connected to shore power, the sound bar will not work. Since the sound bar was only purchased because of the noise of the AC unit, this is not a problem. If using a generator, the sound bar and AC will then work. 😉
If you decide to purchase any of these items, please do so through my affiliate links by clicking on the item photo. This helps you and me. Amazon extends a small percentage to me with no cost to you. And, you get vetted products without having to take the time do the research. Thank you for your support.